January feels like a dead month for gardening, yet what you do now around your hydrangeas can make or break their flowering season. A cheap, quick and almost suspiciously simple gesture, borrowed from professional landscapers, often separates sad, leaf-heavy shrubs from those iconic globes of colour that stop people in their tracks.
January is make-or-break time for hydrangea blooms
By mid-January, winter has settled in across most temperate regions. The visible growth of your hydrangeas has stopped, but the plant is far from inactive. Inside those apparently dry stems, next summer’s flowers are already prepared.
Many popular hydrangeas, especially bigleaf hydrangeas (Hydrangea macrophylla), form their flower buds on the previous year’s wood. Those buds sit exposed on stems through winter, quietly waiting for spring warmth. A brutal cold snap can burn or kill them outright.
Hydrangeas survive cold much better than their flower buds do. Protect the buds and you protect your future flowers.
Late frosts or plunging temperatures in January and February can strip a plant of its flowering potential in a single night. To the untrained eye, nothing looks wrong: the shrub is still alive, leaves will return, but the buds that should have turned into flowers are gone.
That’s why gardeners who grow hydrangeas seriously treat mid-winter as a critical window. The ground is often still workable, and there’s time to shield roots and lower buds before deep frost bites.
Forget the pruning shears: the real secret is at the base
One of the most common mistakes with hydrangeas in winter is pruning them hard at the wrong time. Many people assume all shrubs benefit from a mid-winter haircut. Hydrangeas are different.
Cutting stems in January can remove flower buds and open up fresh wounds that are easily damaged by frost. Those faded flower heads, which may look untidy, actually act like tiny umbrellas, helping shelter lower buds from cold and wind.
Resist the urge to prune in the dead of winter; those “dead” heads are part of the plant’s natural winter armour.
➡️ Dieser alte Lorbeer-Trick ist zurück: Warum man ihn laut Fachleuten an die Tür hängen sollte
➡️ China ‘revives’ a 50-year-old technology that uses 200 times less energy than digital computing
➡️ Einen Korken in den Kühlschrank legen: Der einfache Trick gegen Ihr wirklich größtes Problem
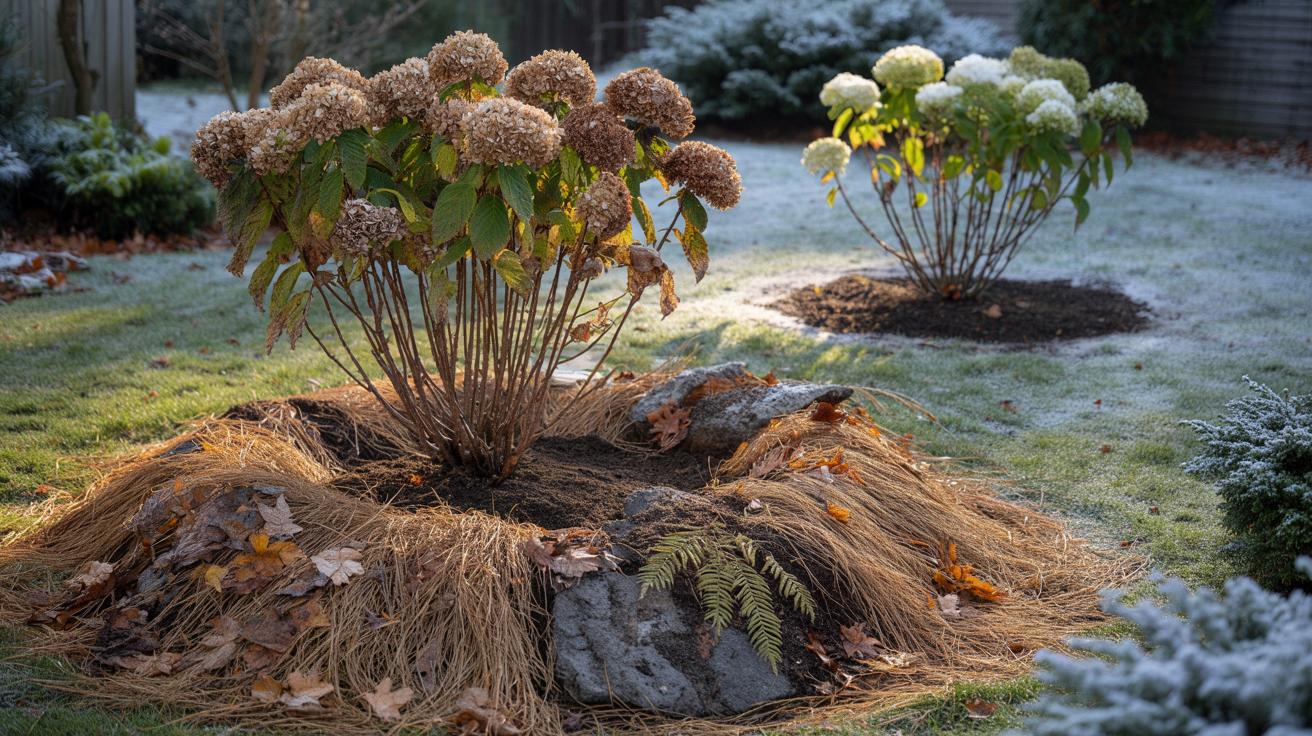
The real game changer lies much lower: at soil level. Hydrangeas like cool, humus-rich, consistently moist soil. Their finer roots sit close to the surface. If the soil freezes deep down, the plant has to invest months into rebuilding root and stem growth before it can think about flowering.
The aim in January is simple: build a thermal shield around the base of the plant, keeping the root zone insulated and the lower buds cocooned from the harshest conditions.
The winter armour: free materials that work better than gadgets
You don’t need special fleece wraps or fancy garden centre kits. The best protection is usually already in your garden or just down the road, if you know what to look for.
Best natural materials for a winter “duvet”
- Fallen leaves: A classic and free option. Oak and beech leaves rot slowly and hold structure, creating a stable, airy blanket.
- Pine bark: Ideal for hydrangeas that prefer a slightly acidic soil. It insulates well and can help intensify blue tones in suitable varieties.
- Straw or hemp: Light, very insulating and easy to handle. The trapped air makes it an effective buffer against temperature swings.
- Dry fern fronds: In wooded or rural areas, dry ferns offer an almost waterproof layer, with added minerals as they decompose.
Think of the forest floor: a loose, thick carpet of organic debris that keeps roots warm and life in the soil ticking over.
How to lay a winter mulch without suffocating your plant
Mulching sounds simple, but a few details make the difference between helpful protection and a fungal mess.
Step-by-step winter protection
| Step | What to do |
|---|---|
| 1. Light clean-up | Remove weeds and large debris at the base, without digging or scratching the soil. |
| 2. Choose material | Pick one or two organic materials from leaves, bark, straw or ferns. |
| 3. Spread evenly | Lay the mulch in a wide circle around the plant, covering the root zone. |
| 4. Build depth | Aim for a layer 10–15 cm thick for real frost protection. |
| 5. Keep stems clear | Leave a gap of 1–2 cm around the main stems to avoid constant damp on the collar. |
The thickness is not negotiable. A thin scatter of leaves looks tidy but does little against penetrating frost. You’re aiming for a proper mattress, not a decorative topping.
At the same time, avoid pressing the mulch down hard. The air pockets between pieces of organic matter are part of what keeps the cold out. A slightly loose, springy texture works best.
From winter shield to spring booster
This winter habit offers far more than cold protection. Once temperatures rise, your mulch slowly changes role.
As the soil warms, earthworms and microorganisms move back up and start breaking down the material. Over weeks and months, that winter duvet turns into a thin layer of dark, crumbly humus that feeds the plant.
One January mulch gives you a triple effect: frost protection now, better soil structure later, and reduced watering in summer.
Hydrangeas respond strongly to good soil life. With more organic matter, the ground holds moisture longer, drains better in heavy rain and gradually releases nutrients. All three help the shrub channel more energy into flower production instead of just surviving.
There is also a water bonus. When the first warm days of late spring and early summer arrive, the old mulch layer still shades the soil and slows evaporation. That means fewer watering cans, less stress on the plant and fewer buds dropping off due to sudden drought.
Common winter mistakes that cost you flowers
Pruning at the wrong time
A quick rule of thumb: if you grow classic mophead or lacecap hydrangeas, avoid heavy pruning in winter. Remove dead wood and shape lightly right after flowering, not in January.
Leaving bare soil around the base
Exposed soil loses heat fast and freezes deeper. In cold winters, that can damage fine roots and lower buds, even if air temperatures don’t look extreme on paper.
Using plastic or stone as winter cover
Gravel, decorative stone or plastic sheeting might look neat, but they trap cold at night and don’t provide the same insulating air layer as organic material. They also do nothing to enrich the soil later.
What gardeners mean by “mulch” and why it matters for hydrangeas
The term “mulch” simply refers to a protective layer spread on the surface of the soil. It can be organic (bark, leaves, compost, straw) or mineral (gravel, slate chippings). For hydrangeas, organic mulch is usually the smarter choice.
Bigleaf hydrangeas dislike soil that swings wildly between waterlogged and bone dry. A decent organic mulch acts like a buffer. It slows both flooding and drying, giving the roots a much gentler ride through the seasons.
Two real-life scenarios: same plant, different winter habit
Picture two neighbouring gardens with the same variety of hydrangea.
In one, the owner rakes leaves away in autumn, leaves bare soil, then prunes hard in January. Spring comes, foliage grows, but only a few flowers appear, mostly on the tips that escaped frost damage. The plant looks healthy but underwhelming.
Next door, the gardener lets some leaves gather at the base, adds extra bark and straw in mid-January and only cuts dead stems in late spring. When summer arrives, the shrub is smothered in rounded flowerheads, with strong stems that hardly flop.
The difference is not luck or plant variety. It’s a 10–15 minute winter habit that costs almost nothing.
Extra benefits and small risks to watch
There are side benefits too. A thick mulch layer cuts down on winter and spring weeds, which would otherwise compete with the hydrangea for water and nutrients. It also protects soil life from pounding winter rain that can compact and erode the surface.
The main risk is excess moisture trapped directly against the stems. That’s why the small gap around the base matters. In very wet climates, using slightly coarser materials such as bark and fern fronds helps keep air moving while still insulating.
For gardeners with several shrubs, this winter routine can be extended to roses, camellias and other shallow-rooted ornamentals. Each plant will gain from better soil structure and more stable conditions around the roots, but hydrangeas, with their frost-sensitive buds, are among the biggest winners.