January is when many of us freshen up the house, but every frame or shelf you remove leaves behind a reminder: raw holes, stubborn anchors and flaky paint. With one wrong move, a discreet fixing can turn into a crater. There is, though, a simple, methodical way to pull out wall plugs and refill the holes so cleanly that even under harsh light, no one can see what used to be there.
Why yanking out wall plugs wrecks your wall
Most people grab a pair of pliers, pinch the tiny lip of the plug and pull as hard as they can. The result is predictable: a chunk of plaster comes with it, the paint lifts, and the “quick tidy-up” becomes a full-blown repair job.
Wall plugs are engineered not to pull out. Force them, and the wall loses the battle long before the plastic does.
How a tiny fixing turns into a giant crater
Behind every plug, there’s a clever bit of engineering. In hollow walls, metal “Molly” anchors open like an umbrella behind the plasterboard. In solid walls, nylon plugs bite into the drilled hole with ribs and barbs designed to stop them slipping out.
When you pull straight toward you, you’re not just fighting a tired bit of plastic. You’re pulling against the structure of the wall itself. Plaster and plasterboard are brittle. They crumble, they chip, and they don’t like being torn.
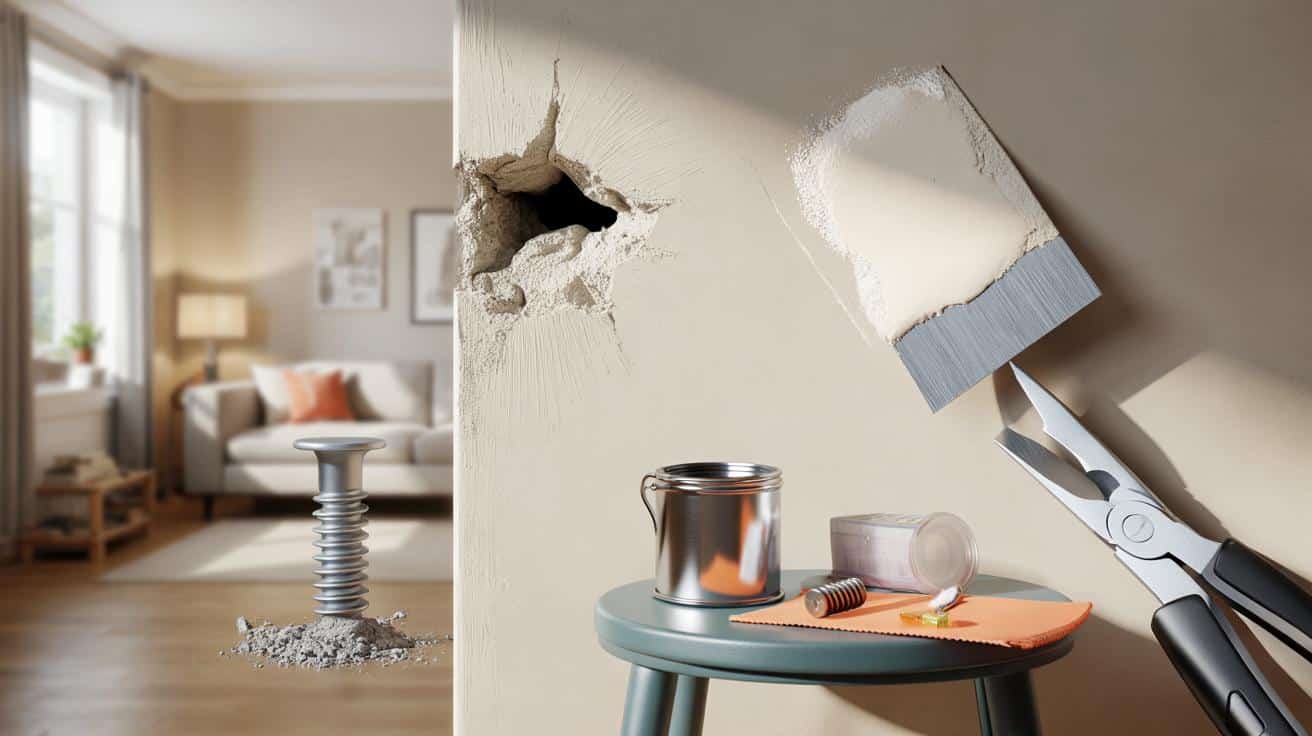
That’s why a 6 mm hole can quickly become a jagged 20 mm gouge, shaped like a cone. The plug remains stubborn; the wall gives way. The trick is not to fight the plug in the direction it holds strongest.
The basic kit that makes a “surgical” extraction possible
You don’t need a full workshop to do this properly. A handful of simple tools is enough for a clean result.
- A screw of the same diameter as the original (or slightly smaller)
- Flat-nose or adjustable pliers
- A screwdriver that matches the screw head
- A flexible filling knife or decorating spatula
- Ready-mixed filler or powder filler
- Fine sandpaper (around 120–180 grit)
Think precision, not power: the right grip, the right leverage, and a gentle hand do far less damage than brute force.
The screw-and-pliers method: the quiet way to remove a plug
Forget corkscrews, knives jammed in sideways, or trying to hammer the plug deeper. Those tricks either tear the plaster or leave a hard lump you can never really hide.
➡️ Dieser alte Lorbeer-Trick ist zurück: Warum man ihn laut Fachleuten an die Tür hängen sollte
Create a solid grip with a partially screwed-in fix
The main issue is that the lip of the plug is small, brittle and often flush with the paint. So you give it a new “handle”.
Take a screw that fits the plug and drive it in just a few turns, about 1–2 cm. It must bite firmly but not push the plug further into the wall. You’re not fixing anything; you’re building a handle.
Once that screw is secure, the fragile plastic rim becomes irrelevant. Your pliers now have a solid piece of metal to hold on to.
The wrist movement that eases the plug out cleanly
Grip the screw head with your pliers. Instead of pulling straight out in one hard motion, work the plug loose with small movements.
Gently rock the screw from side to side, or up and down, while applying a steady outward pull. This breaks the bond between the plug and the wall a little at a time. If the plug is stubborn, rest the curved part of the pliers on the wall with a small piece of cardboard or wood underneath to protect the paint, and use that as a lever.
A controlled rocking motion plus light leverage usually brings the plug out in one clean piece, without ripping half the wall with it.
Done well, you end up with a neat cylindrical hole, only slightly wider than the plug itself, and no great flaking halo of broken plaster.
Refilling the hole so it truly disappears
Once the plug is gone, you’re left with a clean hole that still catches the eye. The repair itself is what people see later, not the plug removal. Good filler work is what separates a visible patch from a wall that looks untouched.
Choosing the right filler for long-lasting results
Old hacks like toothpaste, soap or paper tissue only look decent for about a week. They crack, shrink, or yellow, and they have almost no strength.
Use building-grade filler; anything else will betray you as soon as the heating comes on or sunlight hits the wall.
| Type of hole | Best product | Main advantage |
|---|---|---|
| Small plug hole (up to 8–10 mm) | Ready-mixed lightweight filler | Quick, easy to apply, fast drying |
| Larger cavity from heavy-duty fixing | Powder filler mixed with water | Stronger, less shrinkage, better for depth |
For a standard plug, a ready-mixed paste from any DIY store is usually enough. For deeper, wider holes, a powder filler sets by a chemical reaction and tends to shrink less, so the surface stays flatter.
Filling technique: generous, then controlled
Use the tip of your filling knife to push filler right to the back of the hole. Press firmly to squeeze out trapped air, which can cause later sinking.
Let the filler bulge slightly beyond the surface of the wall. This “hump” is deliberate. When filler dries, it always pulls back a little. If you level it too perfectly when wet, you risk ending up with a shallow dip that shows under side light.
Smooth the area with crossed strokes: one pass horizontally, one vertically. That helps blend your repair into the broader plane of the wall, not just the small area around the hole.
The finishing steps that make the repair invisible
After drying time — from a couple of hours for small holes up to overnight for larger ones — the filler will be solid but slightly rough or proud of the surface.
Sanding for a seamless texture
Take fine sandpaper and work in light, circular motions over the patch. You’re not carving; you’re feathering the edges. Avoid heavy pressure that can gouge the soft filler or scratch the original paint.
Your fingertips are the best inspection tool. If you can’t feel the join, you’re almost done.
Run your hand across the area with your eyes closed. Any ridge or hollow will show up instantly to your touch. If needed, add a second thin layer of filler, let it dry, then sand again.
Blending the paint so there’s no “square patch” effect
If you still have the original paint, you’re already ahead. Stir it well, as old tins often separate. Without the exact paint, pick the closest colour you can, bearing in mind that matt is usually more forgiving than satin or gloss.
Use a small roller or soft brush and load it very lightly. Start by covering just the repaired area, then extend the paint outwards with almost dry strokes that “feather” the edge.
Think of it like airbrushing with a brush: colour strongest at the centre, then fading gently into the surrounding wall.
Avoid painting a perfect rectangle. Soft, irregular edges blend better with the existing surface. Once the paint dries, normal room lighting hides the transition line surprisingly well.
Going further: when to patch, when to repaint everything
Not every wall behaves the same way. On older surfaces, or where paint has yellowed from sunlight or smoking, even a perfect repair can still stand out slightly.
As a rule of thumb, patching works well if:
- The wall is less than a few years old
- The paint finish is matt or eggshell
- There are only a handful of small holes
If you’re dealing with dozens of old fixings or a glossy wall, a full repaint of the entire wall often gives a better result. The effort is higher, but you gain a genuinely “new” surface rather than a patchwork.
Extra tips: planning ahead and avoiding future damage
A few habits can save you from repeated repairs. When hanging heavy objects on plasterboard, use the right type of anchor and avoid over-tightening the screw, which can crush the board. If you think you might rearrange things regularly — picture walls, for example — consider a rail system that takes all the weight and leaves the plaster untouched.
For renters, neat plug removal and invisible filling can be the difference between getting a full deposit back or facing a long argument with the inventory clerk. Practising the technique on a hidden area, like behind a wardrobe, can build confidence before tackling visible spaces.
On the technical side, learning simple terms helps with buying materials: a “setting” filler is one that hardens chemically, stronger and better for deeper repairs; a “ready-mixed” filler is convenient for small cosmetic jobs. Understanding that distinction makes the repair both faster and more durable.
Once you know you can return a wall to a pristine state with a screw, a pair of pliers and a bit of filler, decorating becomes less of a commitment and more of a game. Frames can move, shelves can change, and the fear of “ruining the wall” slowly disappears along with those old gaping holes.